Mar 31, 2011

Crafty Thursday: Birds Nest

This week I made a simple project, a little birds next. My grandmother is so sweet and gives me magazines to look at and I got this fun idea out of a Country Living magazine.
Continue reading to see how to make one for your self!

Mar 29, 2011

Tasty Treat Tuesday: Baked Lemon Pasta

This last week I tried out a new recipe I found from The Pioneer Woman 
I changed a few things I added my parsley to the sauce, and baked it all together and added pepper. I tried it both baked and not; right off the stove the sauce is a creamy heaven, out of the oven the sauce is a little thicker and not as smooth, but the contrast of the crunchy Parmesan cheese is amazing! So either way is yummy!

Mar 28, 2011

Sharing Monday #1

This is my first attempt at a linky party, so hopefully it works!


Chocolate Drool and Kisses

 party guidelines
  1. To link up, I would first love for you to follow my blog. I love followers. Plus it makes my day!
  2. Link up your crafts, recipes, home decor, kid projects, tips pretty much anything you have done that you want to share!! {Multiple links to different posts are great!}
  3. Link back here by grabbing my button above or on my sidebar and posting it either in your post or somewhere on your blog to let others know you've joined the party or using a text link!
  4. If you see something you like, click on it and go leave them a comment. Everyone loves comments!


Mar 26, 2011

Spring Colors!

I have some new fun colors in my Etsy shop
Celery Green and Lavender
Sky blue available in satin or cotton (in the pic its cotton for the main fabric and satin for the center).
I also have a cotton darker lavender available I just don't have a photo yet.

I am also considering starting a Etsy linky party, what do you think? Weekly? Monthly? Leave me a comment and let me know what you think!

Mar 24, 2011

Family Friday: Hand Paper Flowers

This week Sam and I had some fun celebrating spring by making some fun hand print paper flowers.
Aren't they pretty! I had a lot of fun doing it, Sam had fun to the first flower and then was done, this is probably a project more for older children, so we will definitely doing this again in the coming years. Keep reading to see how to make them.

Crafty Thrusday: Race Car Track


So I am dubbing Thursday Crafty Thursday I know lame name, if you have any better suggestions I would love it!

So this week I have been working on fabric roads and race track for Sam. Here is how I made his race track.

What you need:
  • Black Felt
  • Green Felt
  • Freezer paper
  • White paint (I used acrylic because that was what I had)
  • Velcro
  • Pinking scissors
  • Sewing machine
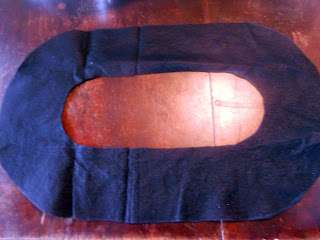
Here is the race track I cut out, I just used a bowl to make the curves, drew it on with a fabric pen and cut.
Then cut out squares of freezer paper and two strips place where you want your finish/start line, remember the freezer paper is where it will be black.
Paint, it takes about 5-6 coats because the felt absorbs lots of the paint, you may need to let it dry and then paint some more.
When dry remove the freezer paper.
At this point I thought I was done, I let Sam play with it and realized it was hard for him to get it to lay flat and when he would drive his car it would move and he would need me to fix it. This got me thinking...

Add green felt to the back, using pinking shears trim the outer edges just to make it look nicer. Pin track on flat and sew on with a zigzag stitch. Make a small strap long enough to wrap around the rolled up track.
Add Velcro to both sides and attach strap to track.
Now its ready to roll up and be put away or to be opened up to play!

Mar 23, 2011

Nearly Wordless Wednesday

I mailed my first three orders from my Etsy shop! Woot!

Mar 22, 2011

Tasty Treats Tuesday: Chocolate Letters and Linky Party!

Last week I went to my wards Relief Society birthday party! Knowing how much I love to make fun cakes they asked if I would be willing to make cupcakes. I was so excited to try out a new decorating style!
Pretty hu? I love how it turned out!
Here is the finished product, and this post is going to tell you how to make those pretty chocolate letters on my cupcakes.

Mar 21, 2011

Blog Redo

So I have had some questions about my blog redo, I did it my self but with the help of other bloggers.

At A bit of this and A bit of that I learned how to embed a PDF to my post like on the It's A Girl post.

At Momma Go Round I learned everything from
She has much more posts with great ideas I just haven't done them yet.
Momma Go Round

At The Graphics Fairy
How to make and install a custom header there you will find a great video that was a major help for me! I also go my background for my header and page buttons from The Graphics Fairy.
The Graphics Fairy

Lastly I get my backgrounds from The Cutest Blog on the Block

So check out the blogs have some fun, but take it one things at a time! I have gotten easily overwhelmed and I have to remind myself the dishes wont wash themselves!

Mar 19, 2011

My Shop Is Open!!!

I have now opened an Etsy shop!
It only has two items in it at the moment but there will be more coming soon!
Currently I have small and medium sized bow ties


Colten wasn't in the best mood about having his picture taken, but still cute either way.

So to check out my Etsy click below!


Photobucket

Mar 18, 2011

Family Friday: Cars Tot Book

I've started making Sam lap books to teach him shapes, letters and colors. I came across this great blog 1+1+1=1 its a blog by a home schooling mom and she has created these amazing tot books and tot packs that are free to print and make!
Click here for the list of tot books and packs.
Well I was checking out the different books and saw she had a Cars book, if you know Sam he LOVES the Cars movie. I opened up the link and Sam happened to be near by, he came to see what I was looking at and said "Mom you make me a Cars book?" how could I say no.
You just print of the pages, for the My Name accordion you download it and put your letters in that you want. We did Sammy.
I wanted to laminate the pieces to make them last, but I didn't have the time so instead I just used contact paper I had at home.
From left to right in the book there is a pocket that holds number cars, below that is the Name accordion. The middle has a book of colors, and the right has a book with shapes.
Here is Sam doing the numbers.
I asked Sam to show me his teeth when he smiled, so he pointed at his teeth, then I tickled him and got a much better smile. He has really enjoyed the book already, we have found its really nice to take it to church to give him something quiet to do when he gets bored (which is about 3 min into the meeting)

So check out her site and make some fun books, I already have a few more I plan on making!
Tot Books & Packs

Mar 17, 2011

Little and Big Brother Shirts

You got a sneak preview to my boys new shirts with the Bleach Pen Letters and the Freezer Paper Stencil posts. Here are the finished shirts!

Poduct Feature: Control-It! Stoping Nail BIting

This is a Sponsored post written by me on behalf of StopBitingNails.com for SocialSpark. All opinions are 100% mine.

So I have always had the nasty habit of biting my nails when I am stressed out. I have broken the habit before just to fall back into it, I am currently not having an issue with it, but I have heard about a product I would like to try if I do start up again or if I start looking for a  nail biting cure for  for my   for my boys.

Its called Control-It! Nail Biting Treatment, it was featured on "The Docotrs" the TV show, you can see the clip from the show here http://thedoctorstv.com/main/home_page?init_type=Feature&init_id=1613 .

It uses 100% natural ingredients, so I wouldn't have too worry while trying to stop my nail biting. Another thing that draws me to the cream is that it not only has the bitter taste which makes you not want to bite but it also helps repair the nail with vitamins and Omega 3.

 They also say it can be used to help encourage a child to stop sucking their thumb. It is suggested you use the treatment for 21 days for it to work. 

So if you are looking for something to help you or your child stop nail biting  sdlk yo  you should check it out.

Visit Sponsor's Site

Mar 15, 2011

Tasty Treats Tuesday: Rainbow Cake Bites

So I saw these amazing yummy Cake Bites at http://www.sugarderby.com/blog/2011/3/5/i-wanna-know-where-tha-gold-at.html I had to give them a try. Well lets say it didn't turn out as beautiful as Sugar Derby's and I was in a huge rush and didn't realize I started with the wrong color so I didn't have enough for very many and I started way to big! So I would follow Sugar Derby's tutorial and I wish you better luck! Even though it didn't turn out how I wanted it to look, it did taste amazing!
Photobucket
Pretty colored cupcake batter
Photobucket
Crumbs
Photobucket
mixing yummy cream cheese frosting into the crumbs
Photobucket
Rolled in melted Reese's peanut butter and chocolate chips, the store didn't have Almond Bark so I had to improvise.
Photobucket
The finished product! They were really big, and going the wrong way but turned out really yummy
Photobucket

Mar 13, 2011

Freezer Paper Stencil

I have made several shirts with freezer paper stencils, and thought I would share how to use them in case anyone out there still doesn't know. I learned how to make them from http://iammommahearmeroar.blogspot.com/ she has a really great blog you should check her out!

What you need:
  • Freezer paper (buy it on the same isle as wax paper)
  • Exacto knife
  • Cutting surface
  • Iron
  • Paint
  • Stiff paint brush
So to start draw or trace your design on the paper side of the freezer paper, then cut out your letters using the exacto knife.
Make sure you cut on something so not to ruin your table, I normally use my scrapbooking mat but couldn't find it so I just used a piece of cardboard. Also make sure when cutting out your letters to save the inside parts of letters like for B, o and e.
Once all cut out place stencil wax side down (or you will have a mess on your iron!) on the shirt where you want and iron using medium heat. When main stencil is set add the inside pieces one at a time and iron in place.
Using a stiff brush I blot on 2-3 coats of paint then I go back over smoothing with the brush and more paint for the last coat. To add more dimension to my shirt I took a damp sponge and black paint and blotted it over my letters you cant really see it in the picture though.  
Let dry and remove the stencil by peeling it away from the shirt. It is a little easier to remove if the paint is still a little damp, just be careful not to smudge it. And there you go a simple freezer paper stencil.

Here are some other freezer paper shirts I have done.